
Corroded battery cables are often the culprit behind no-start and other electrical issues in your car or truck.
 Also if you have upgraded your charging system (higher power alternator) or added accessories like lights and high power audio systems, your stock cables may not be up to the task.
Finding pre-built cables with the length, gauge, and ends you need is often impossible. Building your own used to mean expensive crimp tools, or resorting to ‘hack’ methods like crushing ends in a vice.
We offer an alternative. Pre-measured solder pellets and dual/thick 3:1 heat shrink tubing make it easy to build cables to your needs that will likely be far superior to the OE crimped cables.
Tools Needed:
- Cable cutter / stripper
- Propane or MAPP torch like the ones commonly used for plumbing
- Vice
- Protective clothing, gloves, and eyewear
- Electrical Flux
Supplies Needed:
- Battery Cable
- Copper lug or cast terminals of matching gauge
- Solder pellets of matching gauge
- 3:1 Dual/Heavy heat shrink tubing
Process:
- Cut your cable to the desired length. Strip enough insulation off the cable so that 1/8”-1/4” of wire is exposed when it is fully inserted into the lug/terminal.
- Slide your heat shrink tubing onto the cable if the other end isn’t small enough to put it on afterward.
- Clamp the lug/terminal in a vice.
- Apply flux to the exposed copper on the cable, and a light amount in the lug/terminal opening.
- Preheat the lug for 10-20 seconds
- Carefully insert the solder pellet into the open end of the HOT lug
- Apply heat until the solder pellet is fully melted and the flux is bubbling
- Insert cable end into lug/terminal
- Apply more heat while continuing to push the cable into the lug/terminal. It will likely seat further as you remelt the solder. Look for solder to wick up the cable strands somewhat.
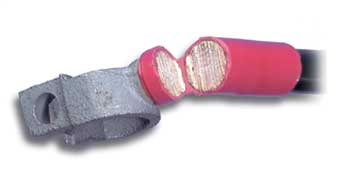
- Slide Heat shrink over the exposed area.
- Heat the Heat shrink until it has contracted over the cable and you see some sealant seeping out the ends.
- Allow to cool.
.